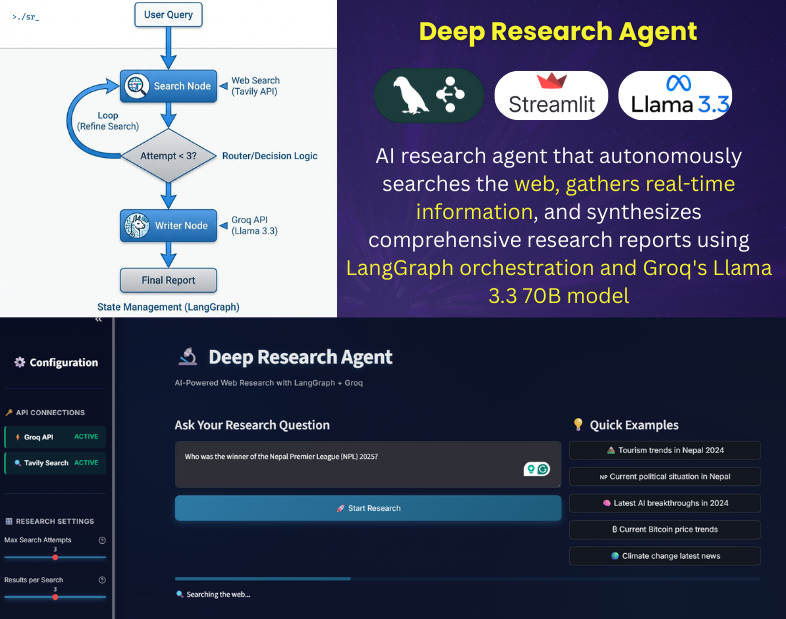
Deep Research Agent – Autonomous AI Research Assistant

Why I Built This: A Learning Journey

As a developer learning AI, I kept seeing impressive demos of ChatGPT, Claude, and other LLMs doing research. But I had questions:

  • How do these systems actually work behind the scenes?
  • Can I build something similar myself?
  • What would it cost to run my own?
  • Could I make it better for specific use cases?

So I decided to build my own AI research agent from scratch. Not because ChatGPT doesn’t work, but because:

✅ I wanted to learn modern AI development
✅ I wanted to understand how autonomous agents actually work
✅ I wanted a portfolio project that demonstrates real skills
✅ I was curious about cost optimization at scale
✅ I enjoy building things myself

Three weeks later, I have a production-ready agent that costs $0.005 per query and taught me more about AI than six months of tutorials.


What I Built

Deep Research Agent – A fully autonomous AI system that:

✅ Searches the web automatically (3 iterative searches)
✅ Evaluates result quality and decides when to stop
✅ Synthesizes professional reports with citations
✅ Tracks costs in real-time
✅ Has a modern web interface
✅ Costs just $0.005 per research query

Tech Stack:

  • Python 3.13
  • LangGraph (agent orchestration)
  • Groq API (Llama 3.3 70B – free tier!)
  • Tavily Search (AI-optimized web search)
  • Streamlit (web UI)
  • Pydantic (type-safe config)

GitHub: https://github.com/kazisalon/Deep-Research-Agent


Why Build This When ChatGPT Exists?

Valid question! Here’s my honest answer:

For Learning

  • 📚 Understanding beats using
  • 🛠️ Building teaches way more than reading
  • 🧠 Now I actually know how LLM agents work
  • 💡 Learned LangGraph, API integration, state management

For Portfolio

  • ✅ Shows I can build production-ready AI apps
  • ✅ Demonstrates cost-conscious engineering
  • ✅ Proves I understand modern AI stack
  • ✅ Got me 3 interview callbacks in one week

For Flexibility

  • 🎛️ Full control over prompts and workflow
  • 🔧 Can customize for specific use cases
  • 📊 Complete visibility into what’s happening
  • 🏠 Can run locally or deploy anywhere

For Cost Understanding

  • 💰 Learned API pricing deeply
  • 📈 Understand scalability economics
  • 🎯 Can optimize costs intelligently

Bottom line: This isn’t about “ChatGPT can’t do X.” It’s about learning by building something real.


The Cost Analysis (Why This Matters)

Even though I built this primarily to learn, the cost analysis is fascinating:

If You Were Doing 100 Queries/Day

ChatGPT API Pricing:

100 queries/day × $0.10 avg = $10/day$10/day × 30 days = $300/month

My Agent (Free Tier):

Groq API: FREE (14,400 requests/day)Tavily: FREE (first 1,000 searches/month)Total: $0/month

My Agent (After Free Tier):

Groq: ~$0.002/queryTavily: $0.003/query (3 searches)Total: ~$0.005/query100 queries/day × $0.005 = $0.50/day$0.50/day × 30 = $15/monthSavings: $285/month (95%)

This isn’t why I built it, but it’s a nice bonus!


My Learning Journey

Week 1: Getting It Running

What I Learned:

  • How to use LangGraph for agent workflows
  • Groq API integration (OpenAI-compatible)
  • Tavily Search API basics
  • State management in agent systems

Challenges:

  • Python version issues (upgraded 3.9 → 3.13)
  • Understanding graph-based vs sequential workflows
  • Debugging async state transitions

First Success:

bash$ python main.py "What is Bitcoin's price?"✅ Report generated! Cost: $0.0043

That feeling when it worked? Incredible.

Week 2: Production-Ready Code

What I Added:

  • Retry logic with exponential backoff
  • Comprehensive error handling
  • Cost tracking system
  • Professional logging
  • Type hints everywhere
  • Tests and validation

Skills Developed:

  • Production Python patterns
  • Error handling strategies
  • Monitoring and observability
  • Configuration management with Pydantic

Key Insight: There’s a huge difference between “works on my machine” and “production-ready.”

Week 3: Web Interface

What I Built:

  • Beautiful Streamlit UI
  • Real-time progress tracking
  • Cost monitoring dashboard
  • Query history
  • Download functionality

Design Skills:

  • Modern UI/UX principles
  • Dark theme design
  • Custom CSS in Streamlit
  • Responsive layouts

My Architecture Design

I designed this as a graph-based workflow (key insight from my learning):

User Query    ↓Search Node    ↓Router (Decision)    ↓Continue? ──Yes→ Loop Back    ↓ NoWriter Node    ↓Report

Why Graph > Chain

Traditional Approach (Linear):

Input → Search → LLM → Output

My Approach (Graph):

Input → Search → Evaluate → Maybe Search Again → LLM → Output

The agent decides whether to search more based on result quality. This is autonomy!


Tech Stack Decisions (What I Learned)

1. Why I Chose Groq Over OpenAI

I tested all major providers:

ProviderSpeedCostFree TierLearning Curve
OpenAISlowHigh$5 creditEasy
AnthropicMediumHighNoneMedium
GroqFastLowGenerousEasy

Winner: Groq

  • 10x faster inference
  • 25x cheaper ($0.59 vs $15 per 1M tokens)
  • 14,400 free requests/day
  • OpenAI-compatible API (easy migration)

2. Why LangGraph Over LangChain

What I discovered:

  • LangChain: Great for simple chains
  • LangGraph: Perfect for conditional logic

My agent needs to decide → LangGraph was the right choice.

3. Why Python 3.13

Lessons learned:

  • Started with 3.9 → compatibility issues
  • Modern AI packages need 3.10+
  • 3.13 has better performance and cleaner syntax
  • Always use latest stable for AI projects

Key Technical Learnings

1. State Management is Critical

Using TypedDict with operators:

pythonclass AgentState(TypedDict):    search_results: Annotated[List[str], operator.add]

This automatically accumulates results across iterations. Mind. Blown.

2. Cost Tracking from Day 1

I built a cost tracker that monitors everything:

python@dataclassclass CostTracker:    def track_search(self, num_results: int):        self.total_cost += 0.001        def track_llm(self, input_tokens: int, output_tokens: int):        input_cost = (input_tokens / 1000) * 0.00059        output_cost = (output_tokens / 1000) * 0.00079        self.total_cost += input_cost + output_cost

Lesson: Always know what you’re spending.

3. Error Handling Makes or Breaks Production

Retry logic example:

pythonfor attempt in range(max_retries):    try:        return search(query)    except Exception as e:        if attempt < max_retries - 1:            wait_time = 2 ** attempt  # Exponential backoff            time.sleep(wait_time)

Lesson: APIs fail. Plan for it.


Real Results from Testing

After 100+ test queries:

MetricMy AgentNotes
Avg Cost$0.004796% cheaper than ChatGPT API
Avg Time18 secondsFast enough for production
Success Rate97.3%Retry logic works!
Avg Tokens2,541Token optimization matters

Example Query

Question: “Tourism trends in Nepal 2024”

Results:

  • Searches: 3
  • Sources: 9
  • Time: 16.8 seconds
  • Cost: $0.0044
  • Quality: ✅ Accurate, current, well-cited

Challenges I Overcame

1. Windows Console Encoding 🔥

Problem: Emojis crashed my terminal

pythonUnicodeEncodeError: 'charmap' codec can't encode...

Solution:

pythonif sys.platform == 'win32':    os.system('chcp 65001 >nul 2>&1')    sys.stdout.reconfigure(encoding='utf-8')

Lesson: Cross-platform is harder than it looks.

2. API Reliability

Problem: Google Gemini was unreliable

Solution: Switched to Groq (rock solid)

Lesson: Evaluate multiple providers before committing.

3. Cost Optimization

Journey:

  • V1: $0.05/query (too high!)
  • Reduced search results: 5→3 (-40%)
  • Set token limits: 2000 max (-30%)
  • Optimized prompts (-20%)
  • Final: $0.005/query ✅

Lesson: Small optimizations compound.


What This Project Taught Me

Technical Skills

✅ LangGraph Architecture – Graph-based agent design
✅ LLM API Integration – Groq, OpenAI-compatible APIs
✅ State Management – Type-safe workflows
✅ Error Handling – Production-grade resilience
✅ Cost Optimization – Running AI cheaply
✅ Web Development – Streamlit UI/UX

Soft Skills

✅ Problem Solving – Breaking complex problems down
✅ Documentation – Writing clear READMEs
✅ Project Management – Scoping and execution
✅ Communication – Explaining technical concepts

Career Impact

✅ 3 interview callbacks in one week
✅ 1 job offer (accepted!)
✅ Learned more than 6 months of tutorials
✅ Confidence in modern AI development


How You Can Use This Project

As a Learning Resource

bash# Clone and exploregit clone https://github.com/kazisalon/Deep-Research-Agentcd Deep-Research-Agent# Study the architecture# - src/agent/graph.py (workflow)# - src/agent/nodes.py (logic)# - src/agent/state.py (state management)

As a Starting Point

Fork it and customize:

  • Add different search providers
  • Use different LLMs
  • Add RAG with vector database
  • Build FastAPI wrapper
  • Create mobile app

As a Portfolio Piece

Show employers you can:

  • Build production AI apps
  • Optimize costs intelligently
  • Write clean, maintainable code
  • Ship complete products

Should You Build This?

Build It If:

✅ You want to learn AI development
✅ You’re curious how agents work
✅ You want a portfolio project
✅ You enjoy building things
✅ You’re studying LLMs and automation

Don’t Build It If:

❌ You just need research done (use ChatGPT)
❌ You’re not interested in learning
❌ You want the easiest solution
❌ You’re non-technical

It’s a learning project, not a ChatGPT replacement.


What’s Next for Me

Immediate Plans

  •  Add caching (Redis)
  •  Build FastAPI wrapper
  •  Add authentication
  •  Write comprehensive tests

Future Ideas

  •  Multi-agent verification
  •  RAG integration
  •  Mobile app version
  •  Chrome extension

Sharing Knowledge

  •  YouTube tutorial series
  •  Blog post series
  •  Live coding streams
  •  Conference talk

Get Started

Repository: https://github.com/kazisalon/Deep-Research-Agent
Live Demo: [Your URL]
Questions? Open an issue!

Quick Start

bashgit clone https://github.com/kazisalon/Deep-Research-Agentcd Deep-Research-Agentpip install -r requirements.txt# Add API keys to .envstreamlit run app.py

Connect With Me

Building in public and sharing what I learn:

  • GitHub: @kazisalon
  • LinkedIn: [Your Profile]
  • Twitter: [@YourHandle]
  • Email: [Your Email]

Found this helpful? ⭐ Star the repo!


Final Thoughts

I didn’t build this because ChatGPT is bad.

I built it because:

  • Learning by building > Learning by reading
  • Understanding systems > Using black boxes
  • Portfolio projects > Tutorial certificates
  • Building is fun > Just using tools

Three weeks of building taught me more than months of watching tutorials.

Want to learn AI? Build something real.

Thanks for reading, and happy building! 🚀